@markdown
# RNN(Recurrent Neural Network)
____
- Sequence 데이터를 처리하는 모델
- 현재의 상태가 다음 state에 영향을 미치는 Network으로 RNN의 아웃풋이 다음의 인풋이 된다.
- 하나의 네트워크가 여러개 복사된 형태를 띄고 있다.
- 음성인식, 언어 모델링, 번역, 이미지 인식 등 여러분야에서 사용된다.
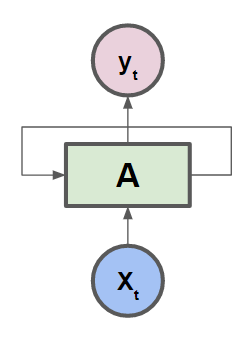
아래의 그림 처럼 다음 state의 값에 입력되어 영향을 미친다.
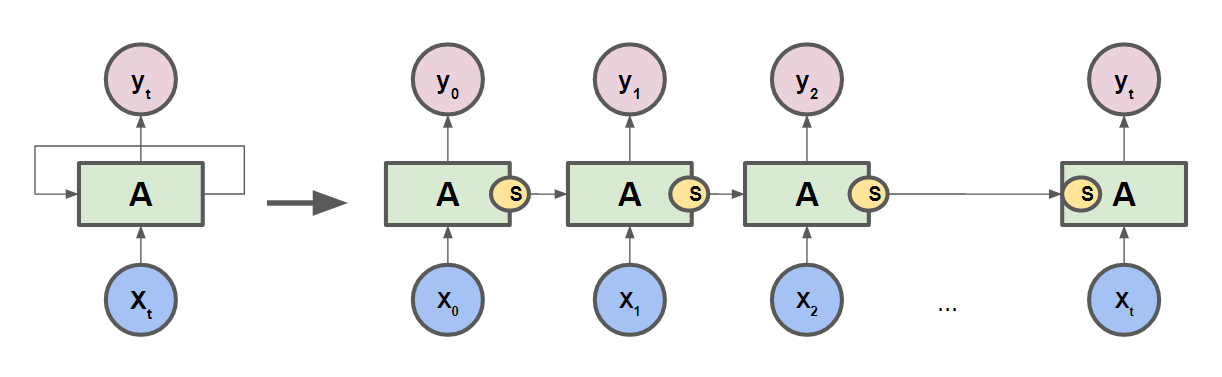
- 이처럼 Recurrent한 모습으로 다음 state에 영향을 주는 Network이 RNN이다.
- 사실상 한개의 RNN Cell로 접혀 있는 형태이지만, 이해하기 편하게 각 Cell들을 펼쳐놓은 형태인 것이다.
## RNN 실행 순서
____
- cell을 만들어준다.
<pre><code class="python" style="font-size:15px">tf.contrib.rnn.BasicRNNCell(num_units=hidden_size)
</code></pre>
- BasicRNNCell, BasicLSTMCell 등 출력의 크기(hidden size)를 정해준다.
- RNN Cell의 출력 크기를 output layer에 전달해준다.
- cell을 만든 것을 실제로 구동시켜 입력을 주고 출력값을 얻어야 한다.
- tf.nn.dynamic_rnn()을 사용
<pre><code class="python" style="font-size:15px">outputs, _states = tf.nn.dynamic_rnn(cell, x_data, dtype=tf.float32)
</code></pre>
- cell 실행결과 결과 출력과 마지막 state의 값을 리턴한다.
## RNN Parameter
____
- hidden size : 출력 데이터 갯수를 지정
- input dim : one-hot 크기, 입력하는 데이터 차원의 크기
- sequence length : cell을 몇번 펼칠 것인가 정하고, 하나로 보이는 RNN을 sequence 길이만큼 펼친다. (예, hello : sequence length가 5)
- batch size : 학습 데이터를 갯수 지정
### hello 단어를 학습시키는 RNN
<pre><code class="python" style="font-size:15px">import tensorflow as tf
import numpy as np
from tensorflow.contrib import rnn
import pprint
pp = pprint.PrettyPrinter(indent=4)
sess = tf.InteractiveSession()
# 각char 해당하는 값으로 One hot encoding 해준다.
h = [1, 0, 0, 0]
e = [0, 1, 0, 0]
l = [0, 0, 1, 0]
o = [0, 0, 0, 1]
# One cell RNN input_dim (4) 입력되면 출력 결과는 2차원 output_dim
with tf.variable_scope('five_sequences') as scope:
hidden_size = 2
cell = tf.contrib.rnn.BasicRNNCell(num_units=hidden_size)
x_data = np.array([[h, e, l, l, o]], dtype=np.float32)
print(x_data.shape)
pp.pprint(x_data)
outputs, states = tf.nn.dynamic_rnn(cell, x_data, dtype=tf.float32)
sess.run(tf.global_variables_initializer())
pp.pprint(outputs.eval())
</code></pre>
<pre><code class="python" style="font-size:15px">실행결과 2차원 결과값이 5개가 출력이된다.
(1, 5, 4)
array([[[ 1., 0., 0., 0.],
[ 0., 1., 0., 0.],
[ 0., 0., 1., 0.],
[ 0., 0., 1., 0.],
[ 0., 0., 0., 1.]]], dtype=float32)
array([[[-0.61468762, -0.65558118],
[-0.76191938, -0.88673586],
[ 0.06304503, -0.87124473],
[ 0.54598409, -0.68941456],
[ 0.51276654, 0.17996152]]], dtype=float32)
</code></pre>
<br/>
### 여러개의 문자열을 학습시키는 RNN
<pre><code class="python" style="font-size:15px">with tf.variable_scope('3 batches') as scope:
# One cell RNN input_dim (4) -> output_dim (2). sequence: 5, batch 3
# 3 batches 'hello', 'eolll', 'lleel'
x_data = np.array([[h, e, l, l, o],
[e, o, l, l, l],
[l, l, e, e, l]], dtype=np.float32)
pp.pprint(x_data)
hidden_size = 2
cell = rnn.BasicLSTMCell(num_units=hidden_size, state_is_tuple=True)
outputs, _states = tf.nn.dynamic_rnn(cell, x_data, dtype=tf.float32)
sess.run(tf.global_variables_initializer())
pp.pprint(outputs.eval())
</code></pre>
<pre><code class="python" style="font-size:15px">실행결과
array([[[ 1., 0., 0., 0.],
[ 0., 1., 0., 0.],
[ 0., 0., 1., 0.],
[ 0., 0., 1., 0.],
[ 0., 0., 0., 1.]],
[[ 0., 1., 0., 0.],
[ 0., 0., 0., 1.],
[ 0., 0., 1., 0.],
[ 0., 0., 1., 0.],
[ 0., 0., 1., 0.]],
[[ 0., 0., 1., 0.],
[ 0., 0., 1., 0.],
[ 0., 1., 0., 0.],
[ 0., 1., 0., 0.],
[ 0., 0., 1., 0.]]], dtype=float32)
array([[[-0.05949434, 0.0235632 ],
[-0.03017001, -0.18992834],
[ 0.07845646, -0.03951443],
[ 0.15064965, -0.00234531],
[ 0.05829915, -0.14448932]],
[[ 0.0090457 , -0.20670123],
[-0.07887676, -0.25804299],
[ 0.05569231, -0.06875275],
[ 0.1360817 , -0.01923694],
[ 0.19081074, 0.00658745]],
[[ 0.09279952, 0.02824003],
[ 0.15827395, 0.04000774],
[ 0.13024381, -0.16428849],
[ 0.12296485, -0.29817694],
[ 0.20391542, -0.09497359]]], dtype=float32)
</code></pre>
<br/>
### Sequence-Loss 계산하기
- output이 얼마나 좋은지 계산한다.
- output sequence의 각각의 계산을 하게되면 복잡하기 때문에 tensorflow의 sequence_loss()를 사용해 간편하게 계산한다.
- sequence_loss(logits, targets, weights) 3개의 값을 한번에 계산해준다.
- logits : y 예측값, targets : 정답을 갖고 있는 y_data(label), weights : 중요한 정도 모두 1
<pre><code class="python" style="font-size:15px">tf.contrib.seq2seq.sequence_loss(prediction, y_data, weigths)
</code></pre>
<pre><code class="python" style="font-size:15px">outputs = tf.reshape(outputs, [batch_size, sequence_length, num_classes])
weights = tf.ones([batch_size, sequence_length])
sequence_loss = tf.contrib.seq2seq.sequence_loss(logits=outputs, targets=Y, weights=weights)
loss = tf.reduce_mean(sequence_loss)
# loss를 AdamOptimizer를 통해 최소화 한다.
train = tf.train.AdamOptimizer(learning_rate=learning_rate).minimize(loss)
</code></pre>
'Deep Learning' 카테고리의 다른 글
| 비지도 학습 - 오토인코더(Autoencoder) (0) | 2018.05.27 |
|---|---|
| TensorFlow - MNIST ReLU, Xavier 초기화, Dropout 적용하여 정확도 높이기 (0) | 2017.08.15 |
| TensorFlow - MNIST 데이터 셋 활용한 손 글씨 인식 모델 구현 (0) | 2017.08.07 |
| TensorFlow - Neural Network XOR 문제 (4) | 2017.08.03 |
| TensorFlow - Learning Rate, Data Preprocessing, Overfitting (0) | 2017.08.01 |